Chicken’s Blog ^_^

(Just code for food)

Let Flood Test Your Site With Flood.io

| Comments

Flood IO is a cloud based load testing platform for JMeter and Gatling that lets you scale out your tests across the globe using our on demand or your own hosted AWS infrastructure. In this article we introduce you to JMeter and how to run your first Flood test.

In this article, I’d like to use JMeter as testing scripts

Getting JMeter

JMeter can be downloaded here and typically you can start JMeter using the jmeter.cmd or jmeter.sh scripts located in the downloaded archive bin directory.

Creating a Test Plan

Once you have created a basic test plan and saved it locally as a .jmx file, you can upload this to Flood IO to create your first Flood test.

Creating a Flood Test

After you login to Flood IO you can click the “+” icon or from your Floods dashboard you can click the “Create Flood” button to create a new Flood.

In the new Flood form, add the .jmx test plan you created using JMeter to the Files input and select a Grid to run your Flood test on. You can optionally set the “Name” or “Tags” to help identify the test in your dashboard.

Start your Flood Test

Read about more [advanced settings] or simply click the “Start Flood” button to launch your test.

You will be redirected to a Flood report which will show you results in real time from the test you just executed on the chosen Grid.

The results in real time

  • Summary about AVG Response Time, Concurence Users and Transaction Rate

  • Summary report by chart

  • Detail transaction

  • You can trace your http connection

Php-cooking

| Comments

This article would help you to setup Chef for PHP stuff step by step

Step 1 - Install required tools

  • Ruby
1
https://www.ruby-lang.org/en/installation/
  • Knife Solo
1
gem install knife-solo
  • librarian-chef
1
gem install librarian-chef

Step 2 - Setup

  • Create new directory for your project

      mkdir /your-path/php-cooking
    
  • Move to php-cooking folder

      cd /your-path/php-cooking
    
  • Initialize librarian-chef

      librarian-chef init
    
  • Initialize knife solo

      knife solo init .
    

After initialazing, you should see the folder structure like below (notice that I added the www folder for containing the php’s web app )

Ok, now is time for adding the necessary cookbooks to Cheffile

Cheffile
1
2
3
4
5
6
7
8
9
10
11
12
13
14
15
16
17
18
#!/usr/bin/env ruby
#^syntax detection

site 'https://supermarket.getchef.com/api/v1'


cookbook 'php', '~> 1.4.6'

cookbook "php55",
  :git => "https://github.com/aporat/php55-cookbook"

cookbook 'php-mcrypt', '~> 1.0.0'

cookbook 'apache2', '>= 1.0.0'

cookbook 'mysql', '~> 5.5.2'

cookbook 'composer', '~> 1.0.5'

This is including php, apache, mysql and composer

Next we will need to install all cookbooks which be specified in Cheffile

    librarian-chef install

After installing, you should see the cookbooks folder as below

That’s good so far, now we should setup roles, enviroments and owner cookbooks for install the web server and deploy your application to web server.

  • Setup dev environent: create a file called dev.json in enviroment folder

dev.json
1
2
3
4
5
6
7
8
9
10
11
12
13
14
15
16
17
18
19
20
21
22
{
  "name": "dev",
  "default_attributes": {
    "apache2": {
    "listen_ports": [
      "80",
        "443"
    ]
    },
  "php": {
      "ext_conf_dir": "/etc/php5/apache2/conf.d"
  },
    "myapp": {
    "user": "vagrant",
      "root_path": "/vagrant",
    "server_name": "phpdev.codeforfoods.net"
    }
  },
  "json_class": "Chef::Environment",
  "description": "",
  "chef_type": "environment"
}
  • Setup myapp role and myapp deploy role: create 2 file myapp.json and myapp_deploy.json in roles folder

myapp.json
1
2
3
4
5
6
7
8
9
10
11
12
13
14
15
16
17
18
19
20
21
22
23
24
 {
      "name": "myapp",
      "description": "The role for app servers",
      "json_class": "Chef::Role",
      "default_attributes": {},
      "override_attributes": {},
      "chef_type": "role",
      "run_list": [
          "recipe[apt]",
          "recipe[build-essential]",
          "recipe[composer]",
          "recipe[myapp]",
          "recipe[myapp::deploy]"
      ],
      "env_run_lists": {
          "dev": [
              "recipe[apt]",
              "recipe[build-essential]",
              "recipe[composer]",
              "recipe[myapp]",
              "recipe[myapp::deploy]"
          ]
      }
  }
myapp_deploy.json
1
2
3
4
5
6
7
8
9
10
11
12
13
14
15
16
 {
      "name": "myapp_deploy",
      "description": "The role for app servers",
      "json_class": "Chef::Role",
      "default_attributes": {},
      "override_attributes": {},
      "chef_type": "role",
      "run_list": [
          "recipe[myapp::deploy]"
      ],
      "env_run_lists": {
          "dev": [
              "recipe[myapp::deploy]"
          ]
      }
  }
  • Create a owner cookbook called myapp, this should be store in site-cookbooks folder

          knife cookbook create myapp
    

Notes:

1) 2 recipes, one for myapp default and other for myapp deploy

defaut.rb
1
2
3
4
5
6
7
8
9
10
11
12
13
14
15
16
17
18
19
include_recipe "apache2"
include_recipe "mysql::client"
include_recipe "mysql::server"

include_recipe "php55"


include_recipe "php::module_mysql"
include_recipe "php::module_curl"
include_recipe "php::module_memcache"
include_recipe "apache2::mod_php5"
include_recipe "apache2::mod_expires"

include_recipe "php-mcrypt"

# disble default site.
apache_site "default" do
  enable false
end
deploy.rb
1
2
3
4
5
6
7
8
9
10
11
12
13
14
15
16
17
18
19
20
21
22
# grant permission for webroot
directory node["myapp"]["root_path"] do
  owner "root"
  group "root"
  mode "0755"
  action :create
  recursive true
end

# reading the data bag
#secrets = Chef::EncryptedDataBagItem.load("secrets", "myapp")

if node.chef_environment == "dev"
      # enable kizang-api site.
      web_app 'myapp' do
      template 'site.conf.erb'
      docroot node['myapp']['root_path']
      server_name node['myapp']['server_name']
end
else

end

2) the Apache configuration template file

site.conf.erb
1
2
3
4
5
6
7
8
9
10
11
12
13
14
15
16
17
18
19
20
21
22
23
24
25
26
27
28
29
30
31
32
33
34
35
<VirtualHost *:80>
  ServerName <%= @params[:server_name] %>
 DocumentRoot <%= @params[:docroot] %>

 <Directory <%= @params[:docroot] %>>
      Options FollowSymLinks
      AllowOverride All

      <% if node['apache']['version'] == '2.4' -%>
             Require all granted
         <% elsif node['apache']['version'] == '2.2' -%>
          Order allow,deny
          Allow from all
          <% end -%>

     RewriteEngine On
     RewriteBase /
     RewriteRule ^index\.php$ - [L]
     RewriteCond %{REQUEST_FILENAME} !-f
     RewriteCond %{REQUEST_FILENAME} !-d
     RewriteRule . /index.php [L]


 </Directory>

  <Directory />
     Options FollowSymLinks
     AllowOverride None
 </Directory>
  ErrorLog ${APACHE_LOG_DIR}/myapp.error.log
  # Possible values include: debug, info, notice, warn, error, crit,
  # alert, emerg.
  LogLevel warn
  CustomLog ${APACHE_LOG_DIR}/myapp.access.log combined
</VirtualHost>

Step 3 - Setup vagrant for create development environment

Ok! Almost Chef setting up is done, now you should create a Vagrantfile and use chef-solo as provision for install development server

Vagrantfile
1
2
3
4
5
6
7
8
9
10
11
12
13
14
15
16
17
18
19
20
21
22
23
24
25
26
27
28
29
30
31
32
33
34
35
36
37
38
39
40
 # -*- mode: ruby -*-
  # vi: set ft=ruby :

  # Vagrantfile API/syntax version. Don't touch unless you know what you're doing!
  VAGRANTFILE_API_VERSION = "2"
  CHEF_PATH = "."
  SYNC_PATH = "./www"
  Vagrant.configure(VAGRANTFILE_API_VERSION) do |config|

      config.vm.box = "ubuntu14.04"
      config.vm.box_url = "https://oss-binaries.phusionpassenger.com/vagrant/boxes/latest/ubuntu-14.04-amd64-vbox.box"
      config.vm.network "private_network", ip: "192.168.34.100"
      config.vm.hostname = "devphp.congdang.com"
      config.ssh.forward_agent = true
      config.ssh.forward_x11   = true

      config.vm.provider "virtualbox" do |vb|
          vb.customize(["modifyvm", :id, "--natdnshostresolver1", "off"  ])
          vb.customize(["modifyvm", :id, "--natdnsproxy1",        "off"  ])
          vb.customize(["modifyvm", :id, "--memory",              "1024" ])
      end


      config.omnibus.chef_version = '11.16.0'
      config.vm.provision :chef_solo do |chef|


      chef.cookbooks_path = "#{CHEF_PATH}/cookbooks", "#{CHEF_PATH}/site-cookbooks"
      chef.environments_path = "#{CHEF_PATH}/environments"
      chef.environment = "dev"
      chef.roles_path = "#{CHEF_PATH}/roles"
      chef.add_role('myapp')
      end

      config.vm.synced_folder("#{SYNC_PATH}", "/vagrant",
                                                      :owner => "vagrant",
                                                      :group => "vagrant",
                                                      :mount_options => ['dmode=777','fmode=777'])
  end

Notice that, I used www vagrant’s sync folder. That means you should store your web application in www folder. In this article I just created a simple php file in that folder

index.php
1
2
3
  <?php
      echo "Hello PHP world!!!!";
  ?>

Finally you need to run vagrant and check the site on the browser

        vagrant up

Once vagrant upping is done, you can check your application on browser

        http://192.168.34.100

Conclusion

You can pull all code from my github

repository on gihub
1
https://github.com/code-for-food/php-cooking.git # fork from github

In this Chef, I’ve setup mysql as well but I just only used php and apache. You can add more code in defaul.rb recipe for using mysql for your project. If you have any question, you can drop an email to me codeforfoods.

Thanks for your reading!!!

How to Switch Careers

| Comments

Making a big career change is never easy, especially if you’ve got kids to support, a mortgage to pay, and a car to worry about. People will tell you you’ve got it great where you are and that the grass is always greener on the other side. What they don’t know is what’s best for you. Switching careers doesn’t have to be the daunting process everyone makes it out to be if you are organized, practical, and thorough with your research.

Method 1 of 5: What Would You Rather Be Doing?

1. Tackle the golden question

If you had all the money in the world, what would you be doing with yourself? Don’t hold back. This is brainstorming time. Make a list of all the things you’d rather be doing with your time. Your first few answers will probably be something like: Take a tropical vacation, spend more time with the kids, etc. But push your thinking beyond that. Ask yourself if you are content with stringent working hours, accounting to higher authorities, etc. If this is what you don’t like, then strive for a self-actualizing job that gives you exactly what you desire or hope to achieve.

2. Consider careers that interest you.

You might have studied accounting at college for the sake of job security and financial certainty. But all the time, perhaps you really wanted to be a park ranger or a freelance troubleshooter. Think back to what once motivated you when you were younger––you will often find the kernel of the things that still motivate and thrill you there.

  • Write a list of the things you loved to do once and the career ideas you had.
  • Add down the ideas for preferred careers that you actually have now. Don’t hold back for such reasons as “lack training” or “no resources to risk it”. At this stage, write down the career paths you’d really rather be following.

Method 2 of 5: Working Out What Else You Can Do

1. Evaluate your skills and talents. Ask yourself: What am I good at? What do I most enjoy doing? Write down every skill you’re capable of. Don’t be shy. Does your current job give you satisfaction and utilize all your potential?

2. Identify transferable skills. After having listed all known skills and talents, identify what skills will best transfer over into the new line of work you’re hoping to change to. The longer the list, the easier the transition.

  • If you have only a few or no transferable skills, do not be discouraged. New skills can be easily learned, while old skills can act as the foundation blocks.
  • Other life experiences can also make this transition easy––remain conscious of the basic life skills that have already been acquired and avoid discounting them. Give yourself a boost and some credit.
  • Pursue your passion to find happiness. Is there a passion outside of your work that has brought you a range of skills that you might be able to use to bolster your transition case?

3. Think of jobs that allow you to do what you really want to do, at least in some form. In what ways will you be able to apply your skills and talents every day? Be creative and open-minded. Focus on what your inner feelings guide you to do.

4. Make a list of everything you want in your new job. make one of everything you don’t want, such as revisiting tedious aspects of your current job. Having this dual list of preferences to guide you will make it easier to check off the jobs that fit and delete the ones that don’t; the list helps you to be more discerning and less ready to jump into the same situation.

  • Be prepared to work gradually towards your needs and wants; steady accomplishments will make the career transition less risky and more likely to work out for you.

  • The list helps you to listen to your gut reactions and not ignore warnings that something isn’t a good match for you. You are changing careers precisely because you want to remove yourself from the warnings, so heed that feeling if it arises.

7 Characteristics That Separate a Boss From a Leader

| Comments

While a leader can be a boss, not every boss is a leader. Although leaders and

While a boss is mostly concerned with outcomes, a leader feels responsible for the process of that outcome and the people who see it out. Check out some major points that distinguish a leader from a boss:

1. Leaders lead rather than rule.

Throughout history, the best chiefs headed their troops in fights or campaigns or whatever. The troops were not afraid because their leader was right there with them. Leaders are there to lead the team forward and to move together.

2. Leaders listen and speak rather than command.

Bosses tend to give orders; they need their employees to listen and to obey. However, leaders always listen to the opinions of their colleagues and regard them as important.

Leaders are always ready for advising, discussion and any feedback an employee has to offer. This reciprocity makes any individual employee feel stronger and gives him or her confidence to follow the leader.

3. Leaders motivate rather than terrify.

While working on projects, people have their ups and downs. Through this roller coaster, bosses are more likely to intimidate into action while leaders will motivate to action.

One of the best things about leaders is that they offer empathy and prepare a group for the tasks at hand. This is very important, seeing as whenever colleagues are not prepared for certain duties, leaders are there to support, teach and back them up. Leaders know that each employee is on the team for a reason and they have faith in every concerted effort.

4. Leaders teach and learn rather than expect and ignore.

A true leader is the person who has self-esteem, but who is not arrogant nor embarrassed to learn from those with lower titles. They know that it is never late to learn more.

This explains the tendency of leaders to always pay attention to their colleagues, knowing there is always more to learn from them. Moreover, leaders are not only takers, but givers, as well. A good leader is not greedy for sharing knowledge and experience with someone else; instead, the leader teaches and nurtures new professionals.

5. Leaders take part rather than stay aside.

While bosses choose to stay aside in the job, leaders take initiative. They watch over the progress of work, make adjustments where necessary and aid team members. They choose to be a part of the team rather than bossing the team around.

6. Leaders reprimand rather than scold or shout.

When necessary, a leader offers constructive criticism. However, a leader never scolds or shouts at any individual, especially in public. They do understand that they are dealing with people and no one has right to humiliate others. Rather, the leader talks to the person individually and without any spike in temper.

7. Leaders establish equal relationships.

Anyone who has ever worked on a team knows what it feels like when the manager chooses his favorites and non-favorites. It always causes stress and tension among team members which comprises productivity.

A good leader tries to treat everyone equally and to not allow personal preferences affect the team dynamic.

During your life, you will face two kinds of managers: leaders and bosses. It does not matter how high the position of these individuals; bossy people are more likely to fail while those who lead will succeed.

Maybe the things I mentioned above do not make any sense for you now, but eventually, you will experience the difference and garner a greater understanding of which manager you prefer for your own professional life.

API Documentation Made Beautiful With Apiary.io

| Comments

Apiary is a free, hosted API documentation repository

The least exciting part of any software project I work on is the documentation. With APIs in particular, documentation can be time consuming because it needs to provide enough detail for any consumer to understand and interface with it. For that reason, proper documentation of an API is even more crucial.

The most recent two projects I’ve been working on both required that full APIs be developed in addition to the core of the platform. On one of them I was building both the API and the client to consume it so the need to describe the API was nil. On the other I’m working in tandem with a colleague and need to communicate the API calls and requirements as they’re completed. My first attempt at doing so was pretty lame. I typed out the API calls for a particular controller and attached sample requests/responses in text files and emailed them across the room. I’m happy to say that was the last time I did that.

As soon as I hit send on that email I knew I was doing something stupid. I asked another colleague about what he had used in the past and he pointed me toward Apiary.io. Apiary is a web based repository for API documentation that also includes server mocking, code samples, automated testing, and GitHub sync. It’s free for most needs including both public and private API documentation.

I created a new account in a single click since I was already logged into GitHub and I was off and running creating my API documentation. Once I got the hang of the Markdown related syntax called API Blueprint, I was able to quickly document each API resource in far greater detail than I had been previously. I then invited my colleague to the Apiary API project and things became much better for both of us. Now he can simply refresh the page to pick up any new documentation and get full detail and examples of each API resource at will.

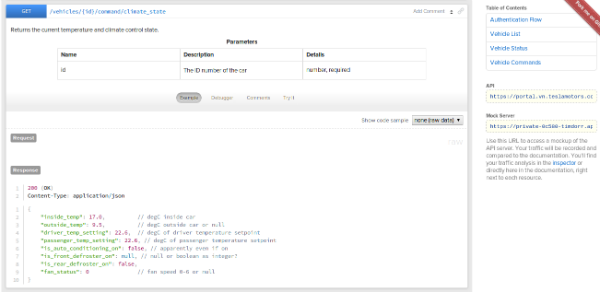
What does the resulting documentation look like you might ask? Here’s a screenshot but you’ll want to head over to one of the featured APIs to check it out for yourself.

So far we’ve been pretty happy using Apiary. There are some helpful features to the system that can aid your efforts such as reusable request and response models, but it’s no silver bullet. Good documentation takes time and it’s probably not possible to completely avoid that.

The only real complaint I have with the system so far is that your entire API document is constructed in a single, loooong page. This works OK for reading because things collapse and there is a table of contents, but for editing, it can be a mess. Aside from that it’s been a great collaboration and organization tool. It’s unlikely that my API would be as well documented as it is in Apiary if I had chosen to write it in some other way.

CORS on Apache

| Comments

To add the CORS authorization to the header using Apache, simply add the following line inside either the <Directory>, <Location>, <Files> or <VirtualHost> sections of your server config (usually located in a *.conf file, such as httpd.conf or apache.conf), or within a .htaccess file:

    Header set Access-Control-Allow-Origin "*"

To ensure that your changes are correct, it is strongly reccomended that you use

    apachectl -t

to check your configuration changes for errors. After this passes, you may need to reload Apache to make sure your changes are applied by running the command

    sudo service apache2 reload

More detail

1
http://enable-cors.org/server_apache.html

[Aws] - Adding a Ec2 Node to an Elastic Load Balancer

| Comments

Installing

  • Install Python

              brew install python
    
  • Install AWS CLI - AWS CLI (http://aws.amazon.com/cli/) is command line tool for working with Amazon Web Service. In this project, we used it for checking the Elastic Load Balancer (ELB) is existed or not, creating an ELB, adding the Health check for ELB, retrieving the EC2 instance information registering EC2 instances to ELB.

      pip install awscli
    
  • Create config for aws at ~/.aws/config and add below content

Config filelink
1
2
3
4
5
[profile default]
output = json
region = us-east-1
aws_access_key_id = <access key id>
aws_secret_access_key = <secret access key>

Coding

add-node-2-elb.sh
1
2
3
4
5
6
7
8
9
10
11
12
13
14
15
16
17
18
19
20
21
22
23
24
25
26
27
28
29
30
31
32
33
34
35
36
37
38
39
40
41
42
43
44
45
46
47
48
49
50
51
52
53
54
55
56
57
58
59
#!/bin/bash
#

# ask to add the node to load balancer

node=$1;
role=$2;
env=$3;
lbName="MyLoadBalancer"
if [ "$node" != "" ] && [ "$role" != "" ]; then

if [ "$role" == "web" ]; then
  if [ "$env" == "prod" ]; then
      lbName="MyLoadBalancerProd"
  else
      lbName="MyLoadBalancerStaging"
  fi   
else   
  printf "Please enter a valid role ('web') \n";
fi 

# http://docs.aws.amazon.com/cli/latest/reference/elb/describe-load-balancers.html
MyLoadBalancer=$(
  aws elb describe-load-balancers \
      --load-balancer-name $lbName \
  );

# the load balancer is node existed, create the ELB first
if [ "$MyLoadBalancer" == '' ]; then
  
  # http://docs.aws.amazon.com/cli/latest/reference/elb/create-load-balancer.html 
  aws elb create-load-balancer \
      --load-balancer-name $lbName \
      --listeners Protocol=HTTP,LoadBalancerPort=80,InstanceProtocol=HTTP,InstancePort=80 \
      --availability-zones us-east-1a \
      --security-groups sg-bac6eddf \

  #http://docs.aws.amazon.com/cli/latest/reference/elb/configure-health-check.html
  aws elb configure-health-check \
      --load-balancer-name $lbName \
      --health-check Target=HTTP:80/index.php,Interval=30,UnhealthyThreshold=2,HealthyThreshold=2,Timeout=3

else
  printf "$MyLoadBalancer\n";
fi

# http://docs.aws.amazon.com/cli/latest/reference/ec2/describe-instances.html
# http://xmodulo.com/how-to-parse-json-string-via-command-line-on-linux.html
# MAC - brew install jq

nodeId=$(aws ec2 describe-instances --filters "Name=ip-address,Values=$node" | jq ".Reservations[0].Instances[0].InstanceId")
nodeId="${nodeId%\"}";
# http://docs.aws.amazon.com/cli/latest/reference/elb/register-instances-with-load-balancer.html
aws elb register-instances-with-load-balancer \
  --load-balancer-name $lbName \
  --instances "${nodeId#\"}"
else
printf "Please enter the node and role adding to ELB.\n";
fi

Usage

./add-node-2-elb.sh 123.456.789.910 web staging 

Command-line JSON Processor

| Comments

jq is a command-line JSON processor.

If you want to learn to use jq, read the documentation at http://stedolan.github.io/jq. This documentation is generated from the docs/ folder of this repository. You can also try it online at http://jqplay.org.

Basic filters

Example1exemple
1
2
3
jq '.'
Input "Hello, world!"
Output    "Hello, world!"
Example2exemple
1
2
3
jq '.foo'
Input {"foo": 42, "bar": "less interesting data"}
Output    42

More details please check it out from original website

Original websiteoriginal website
1
http://stedolan.github.io/jq/manual/ 

Next post, I’d like to use this for parser the aws result. (coming soon.)

Nodejs Cooking

| Comments

  • This project is Chef-Solo, this help to setup development base on Nodejs and Mysql

  • This also includes a demo about Simple API which using Express and Mysql

What was including

Installing

  • Installing librarian-chef and knife-solo
  • initialazing librarian, this would create new forder with named cookbooks and a Cheffile

      librarian-chef init
    
  • Adding nvm and msql cookbook to Cheffile

      cookbook 'mysql', '~> 5.5.2'
      cookbook 'nvm', '~> 0.1.0'  
    
  • Initialazing knife-solo, this would create the folder structure

      knife-solo init
    
  • Installing cookbooks from Cheffile

      libratian-chef install
    
  • Creating an encryption key

      openssl rand -base64 512 | tr -d 'rn' > ~/.chef/encrypted_data_bag_secret
      chmod 600 ~/.chef/encrypted_data_bag_secret
    
  • Adding the path of encryption key to .chef/knife.rb

      knife[:secret_file] = ".chef/encrypted_data_bag_secret"
    
  • Creating a data bag, this stores the security inforamtion (ex database’s password)

       knife solo data bag create secrets myapp
    

Enter something

    {
        "id": "myapp",
         "aws_config": {
            "AWSAccessKeyId": "xxx",
            "AWSSecretKey": "xxx"
          },
      "db_config": {
        "dev": [
            {
                "name": "default",
                "mysql_root_password": "abc@123",
                "hostname": "localhost",
                "username": "root",
                "password": "abc@123",
                "database": "myqpp"
            }
        ]
      }
    }
  • The encrypted data bag will be stored into data-bag/secrets/myapp.js

      {
        "id": "myapp",
        "aws_config": {
          "encrypted_data":               "RjARHBKLm0DTbHDeIB5XjTjdWovyvv5T3V9T79UyEOq4/5Km6LaZ4y7leP7/\nNLCNQaJsUZQASaAII3bzkmwamecn03q5XUp4yDzeYcCqyRhP18BnyCxYDcOm\nc0HD1xEVuOanTt5R7ppJMj3kzN02YESN4CA/+70f0Qkp6yexhVo=\n",
          "iv": "Yr9pDrhjZjhLRxHEBna0nw==\n",
          "version": 1,
          "cipher": "aes-256-cbc"
        },
        "db_config": {
          "encrypted_data": "F6iPNUMY+dzao52SpQqHEWlFbGWUBMWSBAy4FinaCQ0Tbh06nDPgSdNI7qoJ\n3DjfrLBZOV1/8xD9t+SkJI3BEvW+yxCnnDPEz+iiZ8/jYJaypy/Bhrn42EC4\ni2VPb66HnVYD4Uq0pObVWzhLATXfqNZ/79I/bTdHTuhGcynDNzRNjyYEDfIF\nG9SuooNjUAduwmLotW//XxMM4uFNZ04hww==\n",
          "iv": "DbN/KOPibOqNtAkLbdBr0w==\n",
          "version": 1,
          "cipher": "aes-256-cbc"
        }
      }
    
  • Creating a owner cookbook (I created myapp cookbook), this should create at site-cookbook folder

      knife cookbook create  myapp
    
  • Configurating the default root password for mysql::server add site-cookbooks/myapp/attributes/default.rb (create one if this file is not existed)

      secrets = Chef::EncryptedDataBagItem.load("secrets", "myapp")
    
      default['mysql']['server_root_password']   = secrets["db_config"][node.chef_environment][0]["mysql_root_password"]
      default['mysql']['server_debian_password'] = secrets["db_config"][node.chef_environment][0]["mysql_root_password"]
      default['mysql']['server_repl_password']   = secrets["db_config"][node.chef_environment][0]["mysql_root_password"]
    
  • Installing mysql and nvm and node 0.10.33 in site-cookbooks/myapp/attributes/recipes/default.rb

      include_recipe "mysql::client"
      include_recipe "mysql::server"
      include_recipe 'nvm'
    
      # install node.js v0.10.5
      nvm_install 'v0.10.33'  do
          from_source true
          alias_as_default true
          action :create
      end
    
  • Creating deploy recipe, this recipe would help to deploy latest code from github to server and start/restart server

  • Creating the enviroments (dev for Vagrant and prod for real server)

      kinfe evironment create dev
    

Enter something

    {
          "name": "dev",
          "description": "",
          "cookbook_versions": {

          },
          "json_class": "Chef::Environment",
          "chef_type": "environment",
          "default_attributes": {
            "myapp": {
              "root_path": "/vagrant"
            }
        },
        "override_attributes": {

        }
    }
  • Creating the roles

      knife role create myapp
    

Enter something

    {
      "name": "myapp",
      "description": "",
      "json_class": "Chef::Role",
      "default_attributes": {

      },
      "override_attributes": {

      },
      "chef_type": "role",
      "run_list": [

      ],
      "env_run_lists": {
        "dev": [
          "recipe[myapp]",
          "recipe[myapp::deploy]"
        ]
      }
    }   
  • Creating Vagrantfile which would use chef-solo as provision
VagrantfileLink
1
2
3
4
5
6
7
8
9
10
11
12
13
14
15
16
17
18
19
20
21
22
23
24
25
26
27
28
29
30
31
32
33
34
35
36
37
38
39
40
41
42
# -*- mode: ruby -*-
  # vi: set ft=ruby :

  # Vagrantfile API/syntax version. Don't touch unless you know what you're doing!
  VAGRANTFILE_API_VERSION = "2"
  CHEF_PATH = "."
  SYNC_PATH = "./www"
  Vagrant.configure(VAGRANTFILE_API_VERSION) do |config|

    config.vm.box = "ubuntu14.04"
    config.vm.box_url = "https://oss-binaries.phusionpassenger.com/vagrant/boxes/latest/ubuntu-14.04-amd64-vbox.box"
    config.vm.network "private_network", ip: "192.168.34.100"
    config.vm.hostname = "devnodejs.chicken.com"
    config.ssh.forward_agent = true
    config.ssh.forward_x11   = true

    config.vm.provider "virtualbox" do |vb|
      vb.customize(["modifyvm", :id, "--natdnshostresolver1", "off"  ])
      vb.customize(["modifyvm", :id, "--natdnsproxy1",        "off"  ])
      vb.customize(["modifyvm", :id, "--memory",              "1024" ])
    end


    config.omnibus.chef_version = '11.16.0'
    config.vm.provision :chef_solo do |chef|


         chef.cookbooks_path = "#{CHEF_PATH}/cookbooks", "#{CHEF_PATH}/site-cookbooks"
         chef.environments_path = "#{CHEF_PATH}/environments"
         chef.environment = "dev"
         chef.roles_path = "#{CHEF_PATH}/roles"
         chef.data_bags_path = "#{CHEF_PATH}/data_bags"
         chef.encrypted_data_bag_secret_key_path = "#{CHEF_PATH}/.chef/encrypted_data_bag_secret"
         chef.add_role('myapp')
    end

    config.vm.synced_folder("#{SYNC_PATH}", "/vagrant",
                      :owner => "vagrant",
                      :group => "vagrant",
                      :mount_options => ['dmode=777','fmode=777'])
  end

Usage

Develop Environment using Vagrant

Notes:

  • You must install Vagrant first
  • Install vagrant-omnibus plugin

      vagrant plugin install vagrant-omnibus
    

Vagrant up

    vagrant up

You see something like that

    Running handlers:
    [2014-11-02T07:16:20+00:00] INFO: Running report handlers
    Running handlers complete
    [2014-11-02T07:16:20+00:00] INFO: Report handlers complete
    Chef Client finished, 30/36 resources updated in 756.082469267 seconds
Congratulation!!! You are Chef now :)
git reposrepos
1
$ git clone https://github.com/code-for-food/node-cooking.git # fork from github

License

Written by code-for-food

Copyright © 2014 Code-For-Food.

Welcome any comments, please contact me via